Apr 1, 2024

In this guide, we'll walk you through the process of setting up your wallet. Follow these steps to dive in the LibFi testnet.
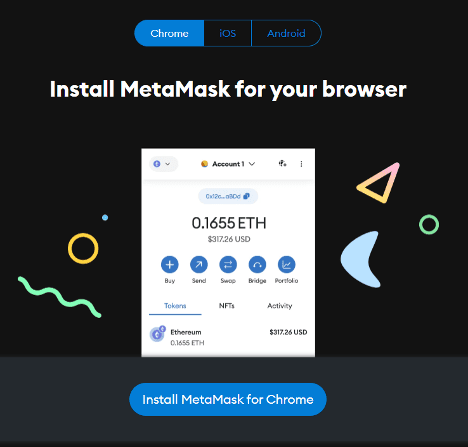
Step 1: Install MetaMask
If you haven't already installed MetaMask, follow these steps to get started:
Desktop (Browser Extension):
Visit the MetaMask website
Click on the "Install Metamask" button.
Follow the instructions to install the MetaMask extension for your preferred browser (e.g., Chrome, Firefox, Brave).
Mobile:
Go to the App Store (iOS) or Google Play Store (Android) on your mobile device.
Step 2: Set Up MetaMask
After installing MetaMask, create a new MetaMask wallet or import an existing one if you have it. Ensure that you securely store your seed phrase as it serves as the key to your wallet.
Step 3: Check out our guide
We’ve got you covered! We have created a guide with simple instructions and easy clickable action items to help get your wallet set up.
Go to our testnet
Follow the Onboarding process if you have never connected to our plafrom yet
After arriving on the homepage, select "Learn how to get started!" from the top banner.
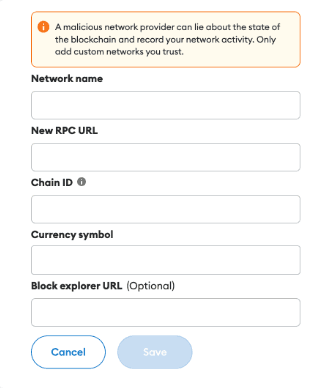
Step 4: Add Arbitrum Sepolia Network to MetaMask
Adding Arbitrum Sepolia network to MetaMask is essential.
If you have not done so in the Onboarding process, you have two ways of doing it :
Step 4.1: Clickable action item
In the testnet guide, click the button located in the section labeled "1. Choose "Arbitrum Sepolia"."
Follow the instructions in Metamask
Step 4.2: Manually in Metamask
Go to this userguide
Search for "Adding a network manually"
Enter the following details:
Network Name: Arbitrum Sepolia
RPC URL: https://arbitrum-sepolia.blockpi.network/v1/rpc/public
Chain ID: 421614
Symbol: ETH
Block Explorer URL: https://sepolia-explorer.arbitrum.ioSave the changes
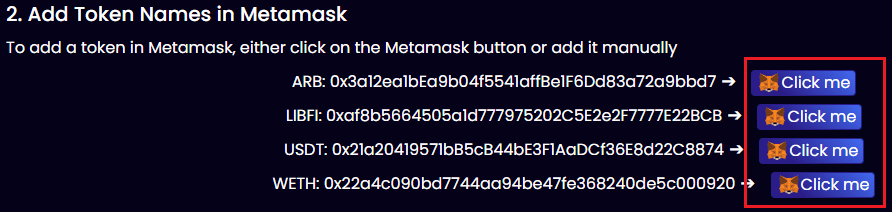
Step 5: Add Token Names in MetaMask
You have two ways of adding the tokens in Metamask :
Step 5.1: Clickable action item
In the testnet guide, proceed by clicking on each button sequentially located to the right of every token address.
Follow the instructions in Metamask
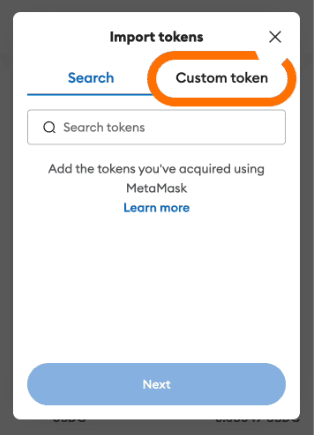
Step 5.2: Manually in Metamask
Go to this userguide
Search for "How to add a custom token"
Add the following tokens:
ARB: 0x3a12ea1bEa9b04f5541affBe1F6Dd83a72a9bbd7
LIBFI: 0xaf8b5664505a1d777975202C5E2e2F7777E22BCB
USDT: 0x21a20419571bB5cB44bE3F1AaDCf36E8d22C8874
WETH: 0x22a4c090bd7744aa94be47fe368240de5c000920
Step 6: Get Your Tokens for Gas Fees
Before you can transact on the Arbitrum Sepolia network, you'll need tokens to cover gas fees. Here's how you can acquire them:
Step 6.1: Get free Sepolia ETH from Quicknode
Connect to the Quicknode Faucet
Connect your wallet and request ETH
Below, you can find an alternative method if you wish to mine Sepolia ETH and bridge it to Arbitrum.
Step 6.2: Get Your Tokens from the Sepolia network
Connect to the Sepolia Faucet to acquire tokens for gas fees.
Enter your wallet address, solve the Captcha and click "Start Mining"
When you have enough tokens, click on "Stop Mining"
After some time, you should received your tokens
Step 6.3: Bridge your tokens from the Sepolia network to Arbitrum Sepolia network
Connect to the Arbitrum Bridge.
Connect your Metamask wallet
Enter the number of ETH that you want to bridge to the Arbitrum Sepolia network
Click "Move funds to Arbitrum Sepolia"
Wait for a few minutes and your tokens should be successfully bridged.
Step 7: Claim LIBFI Tokens
Go to the LibFi faucet
Enter your wallet address
Solve the Captcha
Click "REQUEST LIBFI TOKENS"
Wait for a few minutes and your tokens will be transferred

Step 8: Get your Discord Tester Role
To be able to post tickets and talk to other testers on our platform, please go to our discord in the #add-me-to-testnet channel and type:
Example
This will give you the "ARB Tester" role and open up new sections in Discord so you can interact with the team and other testers.
Step 9: Start Testing
Congratulations! You've completed the setup process. Now, you can start testing the Arbitrum Sepolia network by swapping assets and adding or redeeming liquidity as desired in our platform.
© Copyright 2023. All rights Reserved.
Privacy & Policy | Terms and Conditions